When we look at the natural world, we do not see perfect squares or rigid boxes. We see fluid shapes, flowing water, and soft curves. Modern websites, however, are often full of sharp boxes and static layouts that can tire our eyes and minds.
In this guide, we will show you how to bring natural movement into the digital world. Specifically, we will explore how to add liquid animation to Mastodon themes. Mastodon is a wonderful, decentralized social media platform. By adding liquid animation to its interface, we can make the user experience feel much more organic, gentle, and alive.
Table of Contents
The Biophilic Imperative for Fluid UI
When humans look at digital screens, our brains work harder than they do when we look at nature. This happens because most software interfaces use rigid boxes and sudden, jerky movements. In the field of biophilic design, which means designing technology and spaces inspired by living systems, we try to fix this issue. We want to bring the calming patterns of nature into the code we use every day. One of the best ways to do this on the web is through liquid animation. This type of design mimics the movement of physical fluids, like water moving in a stream or sap flowing down a tree trunk.
The Psychology of Motion
Our eyes evolved over millions of years to track natural movements. When a hunter looks at a forest, their eyes easily follow the smooth bend of a branch or the flow of a river. These smooth transitions do not cause mental fatigue. On the other hand, when an interface uses harsh animations that pop up or disappear instantly, it creates a tiny amount of stress in our brains.
Using liquid animation in a user interface helps reduce this mental load. When a button or a menu moves like a droplet of water, our brains recognize that movement pattern. It feels safe and familiar. This smooth visual style changes our relationship with the screen, making our daily interactions with social media feel far less stressful.
Defining the Main Aesthetic
What exactly do we mean when we talk about liquid animation in frontend web design? We are not talking about heavy videos or slow loading files that make a website hard to use. Instead, we are talking about smart code that makes elements look like they have surface tension and viscosity. Viscosity just means how thick or sticky a fluid is, like honey compared to water.
In web design, liquid animation includes things like the gooey effect. This is where two moving items seem to stretch and blend together before separating, just like drops of water. It also includes organic hover states where buttons change shape smoothly rather than staying perfectly square. It can even include wave dynamics on backgrounds, where the edges of a section ripple gently as you scroll down the page.
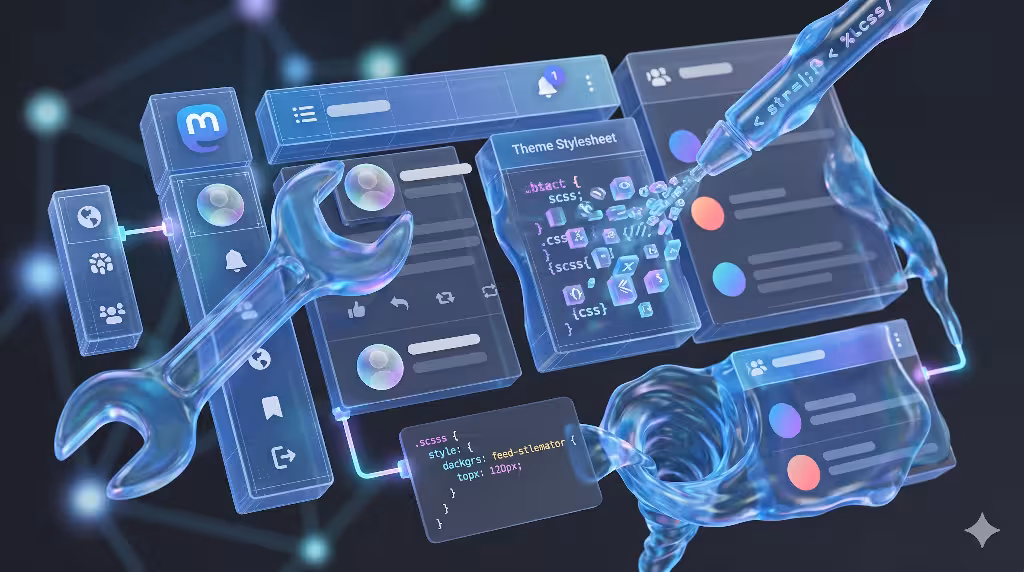
Mastodon Code
To bring this fluid style into the fediverse, which is the network of independent social media servers, we need to look at Mastodon. Mastodon allows server administrators to create custom looks for their users. However, implementing liquid animation inside Mastodon requires a careful balance. We must write our code in a way that does not slow down the website or make it hard for people with disabilities to read.
As we go through this guide, we will look at how to target the specific parts of Mastodon’s code. We will learn how to inject liquid animation into the timeline, the user avatars, and the action buttons. By doing this, we can transform a standard, blocky social media layout into a flowing, organic space that feels connected to the natural world.
Deconstructing Mastodon’s Theming Architecture
Before we can successfully write a liquid animation into a theme, we have to understand how Mastodon builds its visual layers. Mastodon is a complex piece of software. It uses a backend framework called Ruby on Rails and a frontend user interface built with React. This means the visual styles are controlled by cascading style sheets, or CSS, which are split up into organized files using a system called SCSS.
Upstream Vanilla Mastodon vs. Forked Ecosystems
There are two main types of Mastodon setups you will meet when adding a liquid animation to a site. The first is upstream vanilla Mastodon, which is the standard version of the software. The second type consists of forked ecosystems, like Glitch-soc, which are modified versions of the code that include extra features for customization.
In a vanilla Mastodon setup, you can add a basic liquid animation by using the administrative settings panel. The admin panel has a box where you can paste custom CSS. This code will load for everyone who visits your instance. This method is quick, but it has limits. If you want to create a highly detailed liquid animation that users can turn on or off in their settings, you have to build a full theme. This requires adding a custom stylesheet file inside the server directory at app/javascript/styles/ and registering it in a configuration file named config/themes.yml.
If your server runs Glitch-soc, you have access to a much more flexible design system. Glitch-soc uses a feature called flavors and skins. This setup allows you to create separate style layers that sit on top of the main layout. It makes it much easier to deploy a complex liquid animation because the system is designed to handle advanced structural changes without breaking the core parts of the software.
Technical Constraints
When you add a liquid animation to Mastodon, you must work within the limits of the software asset pipeline. Mastodon uses a tool called Webpack to bundle and compress all its styles and scripts. When you modify a theme file, the server does not read the raw code directly in real time. Instead, an administrator must run a command to precompile the assets. This command takes all your fluid styles and packs them into small files that a web browser can download quickly.
This asset pipeline means that your liquid animation code must be written cleanly. If there is a syntax error in your SCSS files, the compiler will fail, and the theme will not load. We also have to remember that Mastodon displays a massive amount of moving data. The timeline updates constantly as new posts arrive. If our liquid animation code is too heavy, the website will stutter when users try to scroll through their feeds.
The Mechanics of Liquid Animation: Three Implementation Approaches
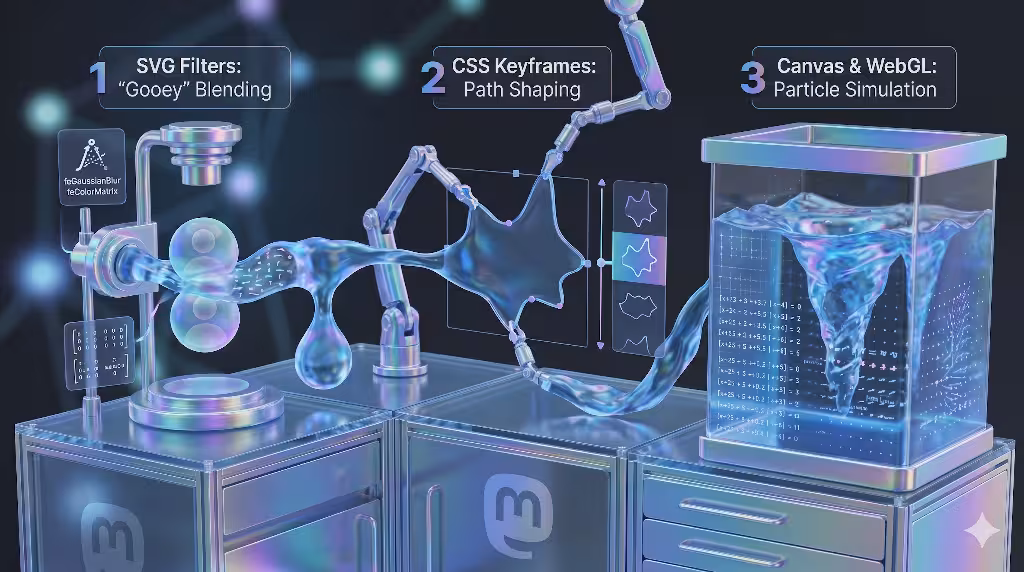
There are three primary ways to build a liquid animation on a modern web page. Each method uses a different layer of web technology, and each has its own strengths and weaknesses when applied to a social network like Mastodon.
Methods of Liquid Animation Implementation
| Method | Technical Mechanics | Implementation Difficulty | Best For |
| SVG Filter Manipulation | Combines blur and contrast filters to create a gooey fluid blend. | Low to Medium | Buttons, notification badges, avatar hovers. |
| CSS Keyframes & Clip-Paths | Uses custom border paths and keyframe loops to distort shapes. | Low | Column backgrounds, loading indicators. |
| Canvas & WebGL Injection | Uses JavaScript shaders to draw realistic fluid simulation pixels. | High | Full page background variations. |
SVG Filter Manipulation
The first method uses scalable vector graphics, or SVG, filters to build the liquid animation look. This is one of the most brilliant tricks in modern web design. To make objects look like liquid, you apply a heavy blur filter to them, and then you apply a high contrast filter right on top of that blur.
The blur filter spreads out the edges of your web elements, making them fuzzy. The contrast filter then takes that fuzzy edge and sharpens it back up. When two blurred elements move close to each other, their fuzzy edges overlap. The contrast filter sees this combined blur and draws a single, sharp line around both of them. This creates a beautiful liquid animation effect where the two elements look like they melt together like drops of mercury. This approach is fantastic for small items on Mastodon, like when a user hovers over an avatar or when a new notification badge pops up.
CSS Keyframes & Clip-Paths
The second approach relies entirely on pure CSS tools, specifically keyframe animations and organic border shapes. If you give a standard box a border-radius of fifty percent, it becomes a perfect circle. However, if you use eight different values for the border-radius, you can create an uneven, fluid shape that looks like a liquid droplet.
By using CSS keyframes, you can smoothly change these eight values over a few seconds. The shape will gently warp and shift, creating a continuous liquid animation without needing any complex math or heavy programming scripts. You can also use a property called clip-path to cut out specific fluid paths from a background. This method uses very little processing power, making it perfect for animating the headers of your Mastodon columns or creating unique, fluid loading indicators.
Canvas & WebGL Injection
The third and most advanced method uses an HTML canvas element along with WebGL shaders. Shaders are small programs that run directly on a computer’s graphics processing unit, or GPU. By using code that simulates fluid dynamics, a shader can calculate the exact movement of thousands of tiny virtual particles on the screen.
This allows you to create a highly realistic liquid animation that responds instantly to the user’s mouse movements. As the mouse moves across the Mastodon background, it leaves ripples and currents in its wake. While this looks incredible, it requires a lot of computer power. It is best used as an optional background theme that users can easily disable if their devices run hot or lose battery too fast.
Step-by-Step Integration Protocol
Now that we understand the theory and the technical options, let us look at the exact steps needed to build and launch a theme featuring liquid animation on a live Mastodon server. For this example, we will focus on using the SVG filter method mixed with organic CSS shapes, as it provides the best balance of natural beauty and smooth performance.
Phase 1: Local Environment Preparation
To begin, you need terminal access to your Mastodon server, or you must work on a local copy of the code on your development computer. Log into your system and navigate to the directory where Mastodon is installed. From there, move into the styles folder by typing cd app/javascript/styles/.
Inside this directory, create a brand new file where we will store all of our custom fluid styles. We will name this file liquid_organic.scss. Creating a separate file is highly recommended because it keeps your custom liquid animation work safe from being overwritten when you update your Mastodon server software in the future.
Phase 2: Defining the Fluid Utilities
Next, we need to set up the specialized filters that make our liquid animation function correctly. Open your new liquid_organic.scss file in a text editor. We will write code that instructs the browser how to blend shapes together.
First, we need to create the helper classes that apply the gooey filter. We can write a style rule that looks like this:
SCSS
.liquid-container {
  filter: url('#liquid-goo');
}

.liquid-element {
  filter: blur(10px);
}
However, for this liquid animation to actually display on the screen, the browser needs to find an SVG filter block named liquid-goo inside the website layout. Since we cannot easily change the React components without modifying the core files, we can inject this filter directly into the main Mastodon structure by using custom CSS properties or by placing a small, hidden SVG block inside our theme’s layout files.
If you are using Glitch-soc, you can easily add this raw code block directly into the main page layout file:
HTML
<svg xmlns="http://www.w3.org/2000/svg" version="1.1" style="display:none;">
  <defs>
    <filter id="liquid-goo">
      <feGaussianBlur in="SourceGraphic" stdDeviation="10" result="blur" />
      <feColorMatrix in="blur" mode="matrix" values="1 0 0 0 0  0 1 0 0 0  0 0 1 0 0  0 0 0 18 -8" result="goo" />
      <feBlend in="SourceGraphic" in2="goo" />
    </filter>
  </defs>
</svg>
This hidden filter is the secret engine behind our liquid animation. The matrix values inside the feColorMatrix tag act like a sharp knife. They look at the blurred elements inside the .liquid-container and cut away the semi-transparent pixels until only a smooth, fluid boundary remains.
Now, let us apply this effect to actual Mastodon components. We can target the notification badges that appear over the column headers. When a new notification arrives, we want it to bubble out of the icon like a fluid drop. We add this code to our stylesheet:
SCSS
.column-header__icon {
  position: relative;

  .badge {
    animation: bubbleOut 0.6s cubic-bezier(0.175, 0.885, 0.32, 1.275);
    transform-origin: center;
  }
}

@keyframes bubbleOut {
  0% {
    transform: scale(0) translate(0, 0);
    border-radius: 30% 70% 70% 30% / 30% 30% 70% 70%;
  }
  50% {
    transform: scale(1.2) translate(2px, -2px);
    border-radius: 60% 40% 30% 70% / 60% 30% 70% 40%;
  }
  100% {
    transform: scale(1) translate(0, 0);
    border-radius: 50%;
  }
}
This specific code uses custom timing rules to create an organic bouncing movement. By shifting the border-radius shapes during the animation cycle, the badge looks like an expanding drop of water rather than a cold, robotic piece of code. This brings a lively liquid animation to the simple act of receiving a notification.
Next, let us make the timeline column headers look more fluid. Instead of a solid, straight line separating the header from the posts, we can use an uneven path that shifts gently over time:
SCSS
.column-header {
  border-bottom: none;
  background: #282c37;
  position: relative;
  overflow: hidden;

  &::after {
    content: '';
    position: absolute;
    bottom: 0;
    left: 0;
    width: 200%;
    height: 10px;
    background: inherit;
    background-image: url("data:image/svg+xml,%3Csvg xmlns='http://www.w3.org/2000/svg' viewBox='0 0 1200 120' preserveAspectRatio='none'%3E%3Cpath d='M0,32L120,42.7C240,53,480,75,720,74.7C960,75,1200,53,1320,42.7L1440,32L1440,120L1320,120C1200,120,960,120,720,120C480,120,240,120,120,120L0,120Z' fill='%231f232b'/%3E%3C/svg%3E");
    background-size: 50% 100%;
    animation: waveFlow 20s linear infinite;
  }
}

@keyframes waveFlow {
  0% {
    transform: translateX(0);
  }
  100% {
    transform: translateX(-50%);
  }
}
By using a light SVG wave drawn directly into the background code, we add a continuous liquid animation that slides horizontally along the bottom of the header. This creates a soft, river-like boundary between different sections of the user interface.
Phase 3: The System Registration
Once your styles are complete, you must tell Mastodon that this new theme exists so that users can select it from their preferences menu. To do this, leave the styles folder and navigate to the root directory of your Mastodon project. Open the configuration file located at config/themes.yml.
Inside this file, you will see a list of active themes. Scroll to the bottom and add a new line that links directly to your stylesheet. It should look like this:
YAML
liquid_organic: app/javascript/styles/liquid_organic.scss
Be very careful with your spacing here. YAML files are highly sensitive to tab and space characters. Make sure you match the exact alignment used by the existing lines in the file.
Next, we need to give this theme a human-readable name so that it shows up nicely in the user settings dropdown. Open the translation file located at config/locales/en.yml. Search for the themes section and add a clear label for your new liquid animation look:
YAML
en:
  themes:
    liquid_organic: "Liquid Organic Theme"
Save both files and close your text editor. The system now recognizes your work as an official part of the server configuration.
Phase 4: Compiling Assets
The final phase is to turn your raw SCSS styles into production files that browsers can load. Go to your server console and make sure you are acting as the user who manages the Mastodon installation. Run the asset precompilation command by typing:
Bash
RAILS_ENV=production bundle exec rails assets:precompile
This command will prompt the server to check your files and build the theme. This process can take several minutes depending on the speed of your server CPU. The system will look at your code and combine it with the rest of the application’s layout.
Once the compilation finishes successfully, you need to restart the main Mastodon background services so the system can reload the updated configuration files. You can do this by running these commands:
Bash
sudo systemctl restart mastodon-web
sudo systemctl restart mastodon-sidekiq
Now, open your web browser and navigate to your Mastodon instance. Log into your account, open the preferences panel, and select the newly created theme from the list. You will immediately see your custom liquid animation running smoothly on your profile buttons and timeline headers.
Accessibility, Performance, and Edge Cases
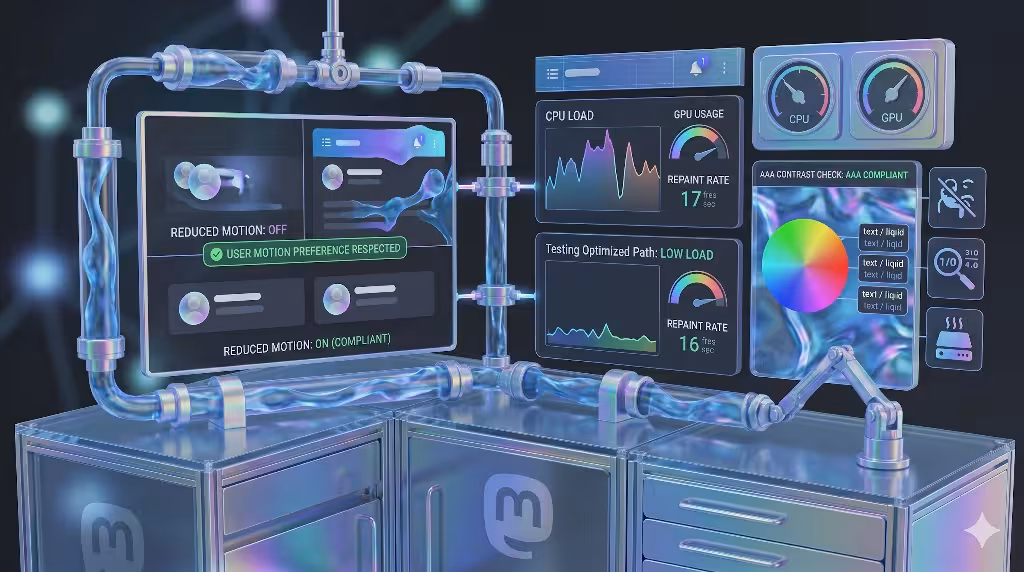
When we build digital designs inspired by nature, we must remember that nature is inclusive. A beautiful liquid animation should never become a barrier for people who interact with technology differently. We have to consider how our code impacts device performance and accessibility.
Honoring User Preferences
Some individuals suffer from vestibular disorders, which are inner-ear conditions that can cause severe dizziness, nausea, and headaches when viewing moving objects on a screen. For these users, an active liquid animation can make a website completely unusable.
Thankfully, modern browsers have an integrated feature that lets users signal that they prefer less motion. We must always respect this setting by wrapping our fluid styles in a special media query block:
SCSS
@media (prefers-reduced-motion: reduce) {
  .liquid-container,
  .liquid-element,
  .column-header::after {
    animation: none !important;
    filter: none !important;
    clip-path: none !important;
    border-radius: 4px !important;
  }
}
This simple block of code acts as a safety switch. If a user has turned off animations on their phone or computer, your system will instantly disable the liquid animation layers. The layout will gracefully change back to clean, static shapes, ensuring that your instance remains comfortable and safe for every single community member.
GPU vs. CPU Bottlenecks
Computers use two different chips to process visual data. The central processing unit, or CPU, handles general tasks, while the graphics processing unit, or GPU, is optimized for handling images and movement. When you write a liquid animation using heavy blur and contrast filters, you can accidentally place a massive burden on the computer system.
If you apply an SVG filter globally to every single post card inside a long, scrolling timeline, the browser will struggle. Every time the user scrolls, the CPU has to recalculate the shape of every blurred edge on the screen. This causes a major drop in performance, leading to jerky scrolling and a high battery drain on mobile phones.
To avoid this bottleneck, keep your liquid animation targeted at small, isolated items that do not repeat infinitely. Use filters on standalone buttons, notification indicators, or pop-up menus. Additionally, you can add a helpful property called will-change: transform to any element using a liquid animation. This tells the web browser to move that element onto the GPU ahead of time, which keeps the frame rate running smoothly at sixty frames per second.
Contrast Preservation
Another common issue with organic fluid shapes is that they can warp and stretch in ways that make text hard to read. If a button’s background uses a flowing liquid animation, the edges of that background will shift constantly. If the fluid shape becomes too narrow, the text inside the button might overflow or blend into the surrounding page.
Always make sure that your liquid animation stays confined within safe boundaries. Use padding around your text links so that the fluid motion only happens on the outer edges of the element. You must also check the contrast levels of your changing shapes. Ensure that the text color and the fluid background color maintain a high contrast ratio that meets modern web guidelines, ensuring that visually impaired users can still read your instance navigation clearly at all times.
Common Questions Answered about Liquid Animation
Below are four critical questions and their answers that frequently arise when designing and adjusting Mastodon themes.
How do I add a custom theme to my Mastodon instance?
Adding a custom look to your Mastodon instance requires administrative access to the server’s backend file system. The process involves two main phases. First, you must place your custom stylesheet file into the designated directory located at app/javascript/styles/. This file should use the .scss format so that it can integrate properly with Mastodon’s pre-existing style variables.
Second, you must register your stylesheet so that the server’s database knows it exists. This is done by modifying the master configuration file located at config/themes.yml. You open this file and append your theme’s internal name along with the direct path to your stylesheet file. If you wish to make the theme available in multiple languages, you must also update the localization text inside config/locales/ to provide a friendly display name for the user options menu. Finally, you run the asset compilation command and restart the server software to make the design live for your community.
Can you use custom JavaScript in Mastodon themes?
In standard vanilla Mastodon, regular users and local theme files are strictly blocked from injecting custom JavaScript into the interface. This rule exists for vital security reasons. If anyone could upload random scripts into a theme, it would create a massive cross-site scripting vulnerability. A malicious actor could write a script that steals private login tokens or reads direct messages from other users on the instance.
However, if you are a server administrator and you want to use advanced scripts to run a complex liquid animation, you have options. You can use the popular Glitch-soc fork of Mastodon. Glitch-soc features a robust system called flavors. Flavors allow administrators to bundle custom JavaScript components directly into the core code on the backend. This allows you to safely load advanced animation libraries or WebGL shader scripts because the code is controlled entirely by the server owner rather than being loaded dynamically by a random user account.
Does custom CSS on Mastodon affect performance?
Yes, custom CSS can have a massive impact on how fast your Mastodon site runs, especially when you are using advanced visual techniques like a liquid animation. When a web browser opens a page, it goes through a complex pipeline to draw the interface. This pipeline includes steps called layout, paint, and composite.
If your custom CSS uses properties that alter an element’s physical layout size, the browser has to recalculate the positions of every other element on the entire page. This takes a lot of processing power. If you run a liquid animation that causes large boxes to constantly recalculate their shapes inside a fast-moving timeline, the browser will lag. To protect your site’s performance, you should always focus your animations on properties that can be calculated separately by the graphics chip, such as transform and opacity. Avoid using global blurs on infinite scrolling columns, and always test your theme on an older mobile phone to make sure it runs smoothly for everyone.
How do I create an organic gooey effect using only CSS?
Creating a beautiful, fluid gooey effect using only CSS relies on a fascinating optical trick involving blur and contrast filters. To build this effect from scratch, you need a parent container element and at least two child elements inside it.
First, you apply a background color to your parent container and add a filter property that boosts the contrast significantly, such as filter: contrast(20). Second, you apply a heavy blur filter directly to the individual child elements inside that container, using a rule like filter: blur(10px).
When the child elements are far apart, the high contrast filter completely cuts away their fuzzy, blurred outer edges, making them look like sharp, slightly smaller shapes. However, when the two child elements move close to each other, their blurred outer zones begin to overlap and mix together. The parent container’s contrast filter detects this combined, dense blur area and fills it in with solid color. This creates a brilliant liquid animation illusion where the two independent items appear to reach out and melt into a single fluid body right before they touch.
The Future of Living Digital Spaces
Bringing the fluid patterns of nature into our digital networks is a vital step toward creating a healthier, more balanced relationship with our screens. By understanding the inner mechanics of Mastodon’s layout system, we can easily bypass its rigid default settings. Using tools like SVG color matrices, organic border curves, and smart GPU properties allows us to craft a gorgeous liquid animation layout that feels completely alive.
As you build and launch your custom fluid themes for your local communities, remember to always prioritize user comfort and accessibility. Keep your animations lightweight, respect the reduced motion requests of your visitors, and ensure your contrast levels remain safe and clean. By blending the deep lessons of biology with the absolute precision of computer science, we can transform the fediverse into a truly peaceful, biophilic environment where human connection can flow naturally.